How to Assign Application Impersonation rights for Office 365 user Mailbox
Application Impersonation is a service for impersonating an Office 365 User Mailbox. With this impersonation permission, Admin can access the User Mailbox and a caller can handle the associated permission which is assigned to the impersonation account. So I am going to discuss that how to assign Application Impersonation rights for Office 365 user Mailbox.
Here I am also going to explain two manual processes which are an Exchange Admin Center or Admin Portal and Windows PowerShell Command line. With these given steps you can easily assign the Application Impersonation permission to any o365 Exchange Online Mailbox. So just follow all the step by step solution for assigning the ApplicationImpersonate Right.
Method 1: Provide Application Impersonation rights to the o365 user mailbox.
You can assign the impersonate permission through the Exchange Admin Center or Admin Portal.
Step 1: For this, you need to log in your Office 365 Admin account. After login the administrator mailbox you need to go to the Admin Center by clicking Admin Option.
Step 2: Now the Admin center window will open on the screen, in this screen, you will see the Admin center option in the bottom left corner side>> hit on Exchange and the Exchange Admin Center window will open.
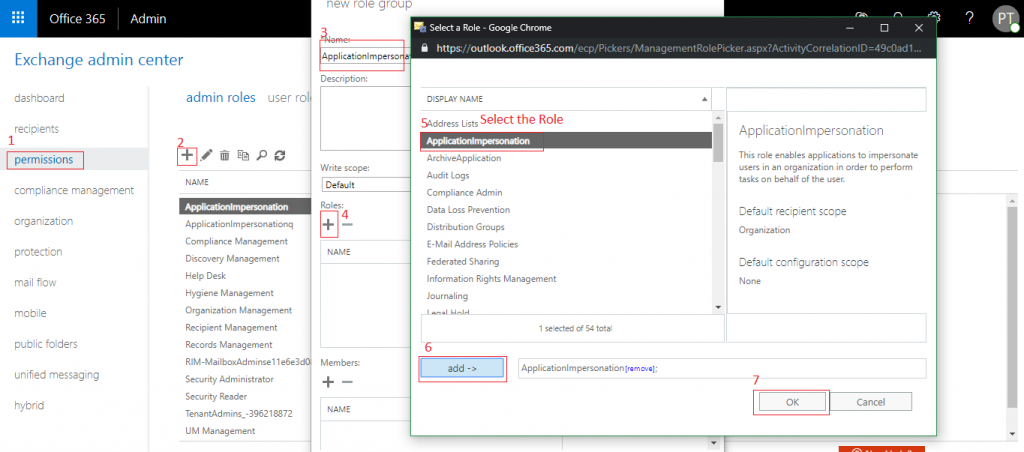
Step 3: Here go to the permission and check that the ApplicationImpersonation service is in the list or not. If it is not in the service list then hit on the + icon and a popup window will open on the screen. Here you need to type the name of the role & description (optional) then select the ApplicationImpersonation role by clicking on role + icon>> Add>> Ok.
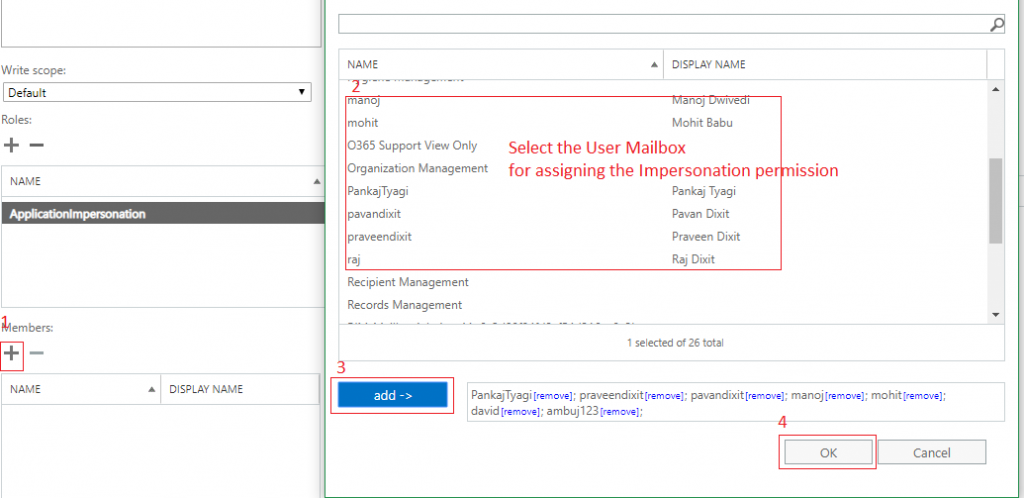
Step 4: Once you add the permission you need to provide the Impersonation rights for the user. So just click on member + icon add to choose the users mailbox>> Add >> Ok and save it.
Note: Assign the Full Assess role to the Office 365 Admin admin.
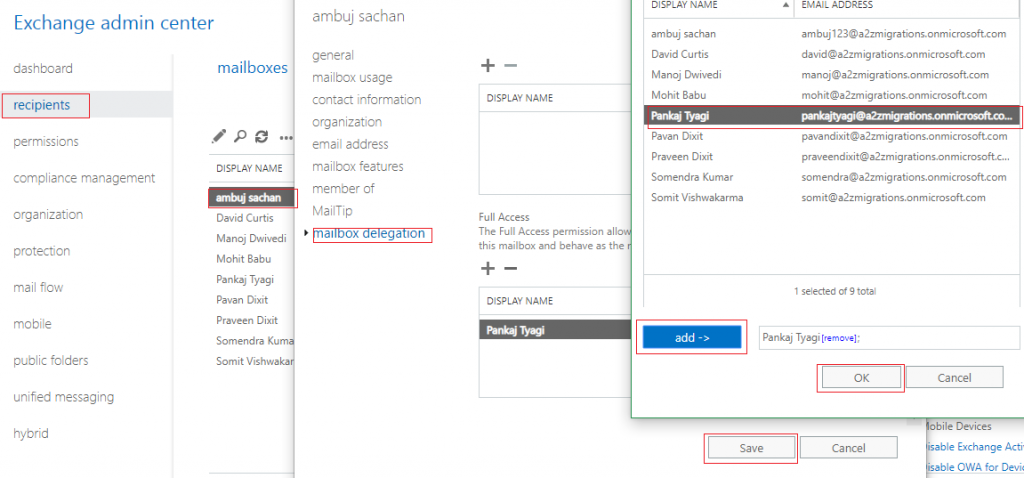
After providing the Impersonation rights for the users you can also assign the Full access to the account. For this you need to go to the recipients on the Exchange Admin Center window>> double click on the user account >> Mailbox delegation in the bottom of the list>> click in full access + sign and select the mailbox in which you want to provide full access>> Add >> Ok at the end hit on save button.
After providing the Impersonation rights for the users you can also assign the Full access to the account. For this you need to go to the recipients on the Exchange Admin Center window>> double click on the user account >> Mailbox delegation in the bottom of the list>> click in full access + sign and select the mailbox in which you want to provide full access>> Add >> Ok at the end hit on save button.
Method 2: Provide the ApplicationImpersonation rights to the user mailbox by the Windows PowerShell
You can also assign the Application Impersonation rights by using the Windows PowerShell and here I am also going to explain the step by step process for providing the Impersonation role for a User Mailbox. So just follow all the given solution to give the Application Impersonation role.
Step 1: First you need to run the Windows PowerShell as an Administrator and assign the Execution Policy to the PowerShell by putting the given command.
Set-ExecutionPolicy Unrestricted
After typing the command hit on enter key on the keyboard and then press Y for allowing the changes.
Step 2: Now connect to the Exchange Online Admin account to the PowerShell by entering the following commands.
$livecred = Get-Credential
$s = New-PSSession -ConfigurationName Microsoft.Exchange -ConnectionUri https://ps.outlook.com/powershell -Credential $cred -Authentication Basic -AllowRedirection
Step 3: Import-PSSession for importing the result.
$importresults= Import-PSSession $s
Note: After that you need to enable the Organization Customization if it is not enabled in your PowerShell.
Enable-OrganizationCustomization
Step 4: Now assign the Impersonation right for the user mailbox by putting the following commands.
New-ManagementRoleAssignment -Role
"ApplicationImpersonation" -User
pankajtyagi@a2zmigrations.onmicrosoft.com
Note: You can assign the Impersonation rights in multiple Office 365 user by creating the CSV file.
Once you create the CSV file you need to enter the following command with the CSV file location path.
Get-Mailbox -ResultSize Unlimited | Select-Object
PrimarySmtpAddress | export-csv " C:\Users\Ravi
Kumar\Desktop\user.csv"
After complete these given commands, the ApplicationImpersonation right will automatically be assigned.
Conclusion: In this post, I explained how we can assign the ApplicationImpersonation rights in the Office 365 Exchange Online user mailbox. Here I discussed two possible methods which will help to provide Impersonation permission in the o365 Cloud platform. If you still have any doubt or query then leave a message on the comment section.