How to set up auto-reply in Office 365 Primary or Shared Mailbox
The Automatic Reply is the auto-response message which is pre-design for all the incoming messages. So here I am going to explain the way how to set up an auto-reply in Office 365 Mailbox.
Here are two possible ways available for enabling the Auto-reply message which will help you to set up an auto-reply for Office 365 Primary, Shared, and Group Mailbox.
Method 1: Setting up automatic reply in office 365 via Exchange Admin Center
For this, you have to open your Office 365 Outlook. So, first of all, you need to log in your office 365 account and go to the Outlook. After opening it you just need to follow the instruction.
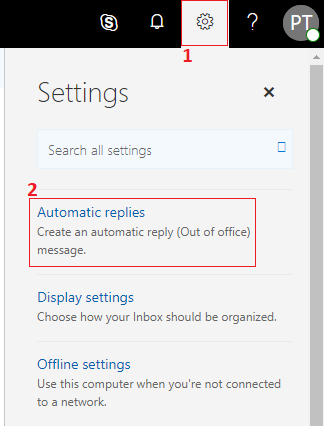
Step 1: In the Outlook window you need to click on the Setting option.
Step 2: Now a few options will appear on the screen and here you need to search the Automatic replies option.
Note: You can also search for it by typing in the search bar.
Step 3: After clicking on the Auto-Reply option you will get a pop-up window. Here you need to choose the Send automatic replies option and type the Message. Once it is done you need to hit on the Ok.
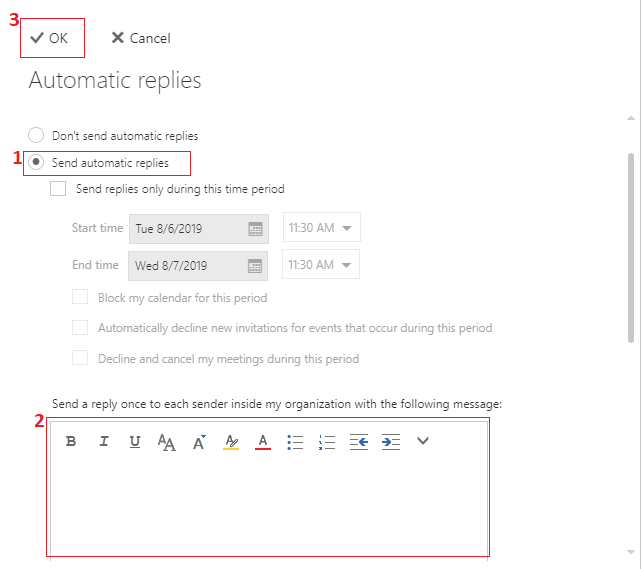
Note: You can also set-up an automatic reply for a particular time period.
You can also set the auto-reply for the Office 365 Group or Shared Mailbox account by the following given steps.
Method 2: Automatic Replies in Exchange Online using Windows PowerShell
The user can also set the Auto reply in Office 365 account or Group & Share mailbox with the help of the following Windows PowerShell command line.
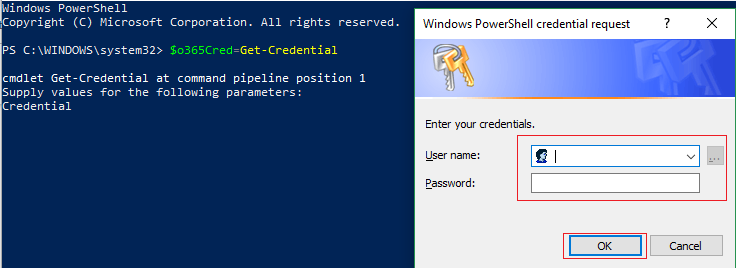
Step 1: Firstly you need to connect the Exchange Online mailbox to the PowerShell. For this, open the Windows PowerShell, run as administrator and put the given commands.
$o365Cred=Get-Credential
$Session = New-PSSession -ConfigurationName Microsoft.Exchange -ConnectionUri https://ps.outlook.com/powershell/ -Credential $o365Cred -Authentication Basic –AllowRedirection
Step 2: After login, Office 365 in PowerShell enter the command to create the PSSession.
Import-PSSession $Session
Step 3: When you create the PSSession you can easily set-up or remove the Automatic replies. Or assign it for particular dates.
Automatic Reply for a single user:
You can assign the Automatic reply for a single user mailbox by putting the given command.
Set-MailboxAutoReplyConfiguration -Identity pankajtyagi -AutoReplyState Scheduled -StartTime "7/10/2019 08:00:00" -EndTime "8/7/2019 17:00:00" -InternalMessage "Internal auto-reply message"
Enable auto-reply for multiple users:
Here you can set the automatic reply for the all users mailbox by entering the given command.
Get-Mailbox -ResultSize Unlimited | Get-MailboxAutoReplyConfiguration | Where-Object { $_.AutoReplyState -ne "Disabled" } | Select Identity,StartTime,EndTime,AutoReplyState | Export-CSV OutOfOffice.csv -NoTypeInformation
Turn off the automatic reply:
Set-MailboxAutoReplyConfiguration –identity alias –AutoreplyState disabled
Final Verdict:
In this post, I discussed how to set up an auto-reply in Office 365 Primary, Shared or Group mailbox. Here I also explained two manual methods one is Admin Exchange Center or Admin Portal and another is the Windows PowerShell. I hope it will help you to enable the Automatic Reply message. If you still have any query related to this blog just leave a message on the comment box.