How to create a new user account in Office 365 Exchange Online Mailbox
Microsoft Corporation provide an advance services which is the Office 365 Cloud platform. Now this o365 Exchange online going popular for our services and make easy to do the business. In the Office 365 Admin account you can monitored all the activities of your organization from anywhere in any device including phones. It also have many features but here I am going to explain that how to create a new user account in Office 365 Exchange Online Mailbox with the step by step process.
I also going to discuss different – different ways which is the Admin Portal or PowerShell process for creating the o365 user mailbox account you can use any one of them.
Method 1: Create a user mailbox in MS Office 365 using Admin Portal
You can easily create a gust user account in o365 Cloud Platform by the Exchange Admin Center.
Step 1: For creating a user mailbox in Outlook 365 you need to log in with the Office 365 Admin account.
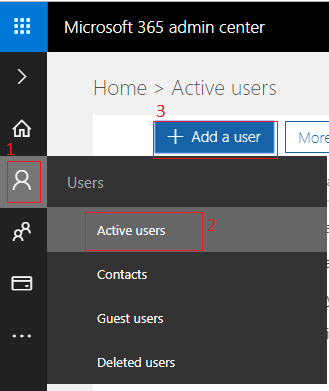
Step 2: After login your Microsoft 365 Admin mailbox you will see an Office 365 home page screen then go to the Admin.
Step 3: Once you hit on the Admin button and the Admin center window will appear on the screen. You can click on Add a user option to create a user mailbox directly or you can also create a user account by selecting the users option in the write corner option >> Active users and a new window will open on the screen >> choose to Add a user.
Step 4: When you hit on Add a user button a new user window will appear on the screen and here you need to type the required information, you can create the password and assign the role of the new user account.
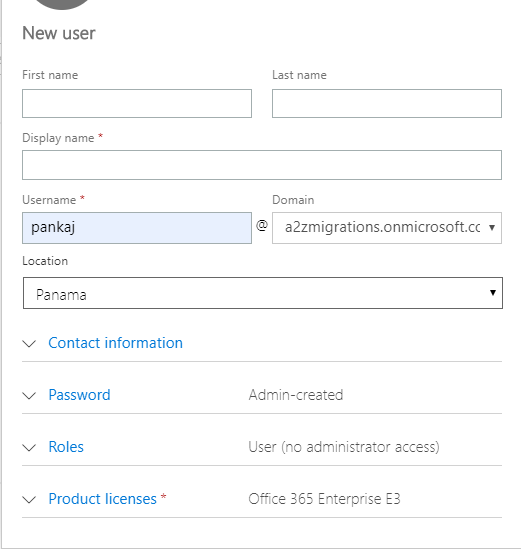
In the above screen you can see some option by which you can assign the password or role.
Note: In the contact information you can type your personal information and it’s an optional option.
Password: Here you will get two options by which you can create a user password.
One is auto-generate Password and another is let me create option you can use any one of them but here I recommend you to use the second one option. So just check on the Let me create the password option and put a password.
Role: In the role features you will see three role you can select any one of them and if you want to enter the alternative email address you can also type here.
Product licenses: By default the Office 365 license will on but if you don’t want to assign any product licenses then you can on the create user without product license option.
Step 5: Once you done just hit on Add button. After that a window will come again here you will see a send password in email option which is by default checked. It you want to check it then click send email and close. Otherwise you can unchecked it or directly close this window by hitting on close button.
Method 2: Create a user mailbox in Office 365 Cloud Platform via PowerShell
Most of the users prefer the Windows PowerShell to create the Office 365 User account so here I Am going to describe that how to create a single or bulk user mailboxes in o365 Exchange Online environment using PowerShell commands.
Step 1: While you are using the process then I suggest you to install the pre-required application before using the PowerShell command lines:
1. Verify that the Microsoft .net framework and Windows Management Framework installed or not. If it is not installed in your PC so first you need to download from the Microsoft Official website and install it.
2. Install MS online Services Sign-In Assistant for IT Professionals RTW.
Step 2: After installing the pre-required permissions you need to open Windows PowerShell as an administrator.
Step 3: Once it done a Windows PowerShell window will appear on the screen.
In this screen you need to type some following commands for installing the modules of ActiveAD and MSOnline services.
Install-Module –Name AzureAD
Install-Module –Name MSOnline
Step 4: Now connect your Office 365 admin account with the PowerShell so put the given command and hit on Enter key on the keyword.
$UserCredential = Get-Credential
After hitting the Enter a login popup will appear on the screen so type your Admin Mailbox ID and Password >> Ok.
Step 5: Once you log in with the Exchange Online mailbox, you need to connect with the MsoService so run the given command.
Connect-MsolService -Credential $UserCredential
Step 6: After connecting the MsolServices you can create a user account with the product license and location by entering the following command.
Note: Before creating the user account I suggest you to check the product license by running the given command.
Get-MsolAccountSku
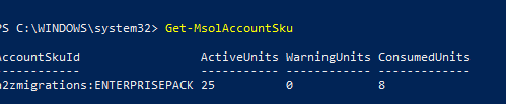
Once you checked the license you need to put the following command with the location and the product license.
New-MsolUser -DisplayName "Manoj Dwivedi" -FirstName "Manoj" -LastName "Dwivedi" -UserPrincipalName manoj@a2zmigrations.onmicrosoft.com -UsageLocation In -LicenseAssignment a2zmigrations:ENTERPRISEPACK
Note: If you don’t want to assign the Product license then you can leave this –LicenseAssignment command.

Step 7: Now the user mailbox will successfully create and the password will auto generate, but if you want to change the password then you need to type:
Set-MsolUserPassword -UserPrincipalName manoj@a2zmigrations.onmicrosoft.com -NewPassword Mails@123

Now you ca see that the user Mailbox is successfully created you can login with your created User Account. Once you sing in your account it will ask your password so put your create password after that you can also create a new password.
Conclusion: In this article, I explain that how to create a user account in Office 365 Exchange Online Mailbox, and here I also explain two ways for creating a new 0365 User account one is the Exchange Admin Center or Admin Portal method and another is using Windows PowerShell commands. If you still have any doubt then leave a message on the comment session.